Wednesday, January 31, 2018

Underwater Tags

Hey stampers, Anni here!
Today I have three tags to show!


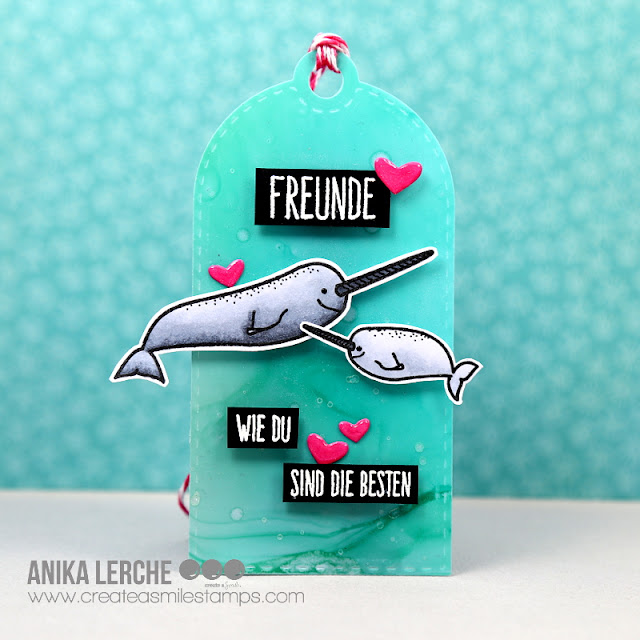
I still felt inspired by the last challenge called Tag It (I'm sorry, it's over), so I wanted to make some tags. And I am totally in love with alcohol inks right now that's why I had to include them in my project.


  • I started by creating an alcohol background. I used alcohol inks and blender solution. 
  • From that background I die cut three tags.
  • As it looked like water I decided to go with matching images. I stamped, coloured and fussy cut them.
  • For the sentiments I was inspired by the current challenge (it started today). The theme is For Someone Special. The meaning of the sentiments is "For You", "Friends Like You are the best" and  "Feel hugged".
  • I added some details as rhinestones, hearts and Nuvo drops.
  • I finished the tags by adding some twine to them.


Don't forget to play along in our new challenge.


We dare to create a smile - For someone special edition

Hello everyone!

Time for another challenge and this time is '' For someone special '' and the Challenge Design team are coming with some gorgeous examples to inspire you to play along with our challenge !
Don't forget we have freebies too , so if you don't have a stamp set from Create a Smile just check the blog for freebies and come play along with us.

Also you have the chance to win a 25€ gift card to Create a Smile shop 


Now lets see what our team created 

Alberto created this amazing scene , wow look at that sky <3 using our When you're not around stamp set


Ale created this cute wintery scene using Bear mail stamp set


Christine created this fabulous card using Bad day stamp set


Galina created this super cute card using Underwaterlove stamp set


Kaja created this adorable card using Served up! stamp set  and Focal point stencil


Nicky  created this way too adorable card using Cool budies stamp set


Marina from Create a Smile DT also created this fabulous card where she used some of our critters and I really love the look of it Cart full of treasures stamp setDoctor's helpers stamp set Friends &couples stamp set Light up the dark stamp set Served up stamp set When you are not around stamp set


Hope you got inspired and now is your turn to be creative! Can't wait to see your creations !

Here are also the rules to play along please take a moment to read them and most important have fun!


Tuesday, January 30, 2018

Hello and Smiles

Hi everyone and welcome back to our crafty space.
Raluca here with a new card showcasing some of the products from the new release.


These circle dies are so awesome and I wanted to use all of them on a card, but I tried to create a clean and simple card.


* First I prepared a white card base for my card.
* Then I die cut all the circles from different pastel colored cardstock and glued them on the card base.
* Next I die cut the solid hello from white cardstock 3 times,  stacked them together and glued them in the center of the card.


* I completed the greeting using the "Just saying Hello" stamp set.
* I glued a few clear sequins and my card was done.


Pretty Pink Posh Sparkling Clear Sequin MIX


If you love Instagram like I do, you can follow Create A Smile using the name @createasmilestamps and if you have any questions about card making, techniques or products or if you want to share your creations with Create A Smile fans join us on our Facebook group Create A Smile - Friends & Family :).

Have a lovely Tuesday!
Thanks for stopping by,
Raluca


Monday, January 29, 2018

Hello, from afar...........

Hi there it's Anja again with another card for you today.


I hope you have seen the new release and maybe you have already ordered some of those great new supplies. I have used them in todays card to show you what you can do with them.


First I started with a horizontal cardbase and diecut a rectangle out of some white cardbase. I used the new focal dots stencil with some Rainbow distress ink colors. I created a sky by turning the stencil everytime. Then I diecut a circle out of the panel and diecut a circle out of some pink cardstock and placed it back in the panel. I stamped the image with black ink and clear embossed it. I cut a strip out of the panel to give some extra interest. The stripe is glued down flat and the rest of the panel is adhered to the card using some foamtape.
I diecut the word hello and adhered it. Stamped the sentiment several times without reinking.


Stamps;

Just saying hello and Lucent landscapes.


Stencil;

Focal dots;


Cool cuts (dies);

Hello twice, Postage edge circles, Double stitched rectangles.


Show us what you create with all those new and old supplies either here on the blog or instagram or Facebook and be sure to come back since we will have another challenge pretty soon.

Have a great week;
Hugs Anja

Sunday, January 28, 2018

Hallo - How Are You?

Hey you! It's Sunday and that means I have a brand new card for you today. I'm using a bunch of brand new products! I hope you have been shopping for the new stuff :) I'm here to share a little inspiration of what you can do with them. 


I wanted to use those new Postage Edge circles and I've started out but cutting five pieces and covered them completely with gold embossing powder. You could colour them however you please but I thought the metallic gold would give it an "industrial" feel. 

I wanted to put a rainbow "hallo" but I didn't like how it looked. I ended up with cutting another "hallo" and stuck it on the rainbow piece but I've off-set it a little bit so that you could still see the rainbow beneath it. 

To bring in more colours, I've added a number of the enamel stickers to the card :) 


Nur mal hallo sagen - Stamp Set

Ranger Gold Embossing Powder
Prima Marketing Watercolour


Follow Create A Smile on Facebook keep yourself updates on all the happenings and if you're an Instagram addict like I am, you can follow Create A Smile using this name : @createasmilestamps ! :)

Mail Call : Christine is looking to decorate her office with your beautiful Create A Smile cards creation. Send your cards to Merremstr. 21, 47053 Duisburg, Germany.


Thanks for stopping by,

Saturday, January 27, 2018

Accenting with Acrylic Inks - In Bloom

Hi Marika here! I got a new card for you, today's card (and video) is all about friends and flowers. I'm longing for the spring and summer so I thought flowers, pink/reds and greens would convey that.


The idea behind today's card came out of wanting to use a new tool, my blending brush. But in the end it became all about adding accents to stamps with acrylic ink. I just couldn't stop myself I was having so much fun.


To see how I put the card together you can watch the video below.


A little tip is that you don't really need acrylic ink, if you have a white gel pen you can get a similar result, white paint works great too!


Flowers: In Bloom
Sentiment: Friends like you

Monday, January 22, 2018

Tag it mail........

Hi there Anja here with another card for you today.


I love challenges so here is another take on the new challenge over at the create a smile stampsblog; tag it.


I diecut the two tags with the lovely tags M and lovely tags XS dies out of copic friendly white cardstock. Adhered them together and stamped the envelops in the background. Copic colored them in a Rainbow way and stamped the bear onto a leftover piece white cardstock and also colored him. Finally I stamped the sentiment and adhered everything together and tied some twine.


Stamps;

Bear mail


Cool cuts (dies);

Lovely tags M and XS;


We would love to see what you come up with so join our challenges on the blog and also on Facebook.
Make sure you come back this week since it's release week so stay tuned for the complete reveal on Friday.

Have a great week;

Hugs Anja