Monday, August 24, 2020

Winners from August Mood board challenge

Hello everyone !

finally i'm back from my vacation just in time to announce the winners from our latest mood board challenge . We loved seeing all your magnificent creations and how you've been inspired by the challenge .

Also wanted to let you know that by playing along with our challenge you get the chance to win a 25€ gift certificate to Create a smile store and to be guest designer for our next challenge!


Our winner is Tinne with this beautiful card using Pure poppies stamp set

Congrats  please send an email to challengeteam@createasmilestamps.com to claim your prize ! Is so well deserved !

Our featured artist is Sweet &Kreativ and she created this lovely card using Unmatched stamp set


Congrats !! You can take the badge and display it on your blog is so well deserved ! (Also send an email to challengeteam@createasmilestamps.com if you would like to guest design for our next challenge)

Thank you everyone for playing along with our mood board challenge ! Make sure to check the current challenge and we hope you play along 

Until next time have a lovely day

Alexandra

Saturday, August 22, 2020

Treat Yourself!

Hi there!
Samantha here, and today I have a card, that's perfect for starting off the weekend! Ha!


That cute little mouse image and the overside drink is just soooo sweet together! And it works even better with that fun phrase on the bottom!! Ha!! 


Let's make this card together!

- first, I colored the images with Copic Markers!
- next, I added some details with a white gel pen to the images, then fussy cut them out!
- I used Distress Inks in Wilted Violet, Blueprint Sketch and Mermaid Lagoon to ink blend the background! 
- then I used the same colors, but with more pressure this time, and a stencil to add some clouds to the background!


- I also splattered some water on top!
- I attached the images with foam tape to the card front
- and the sentiment was stamped underneath!


Instead of ink blending over the stencil to add some cloudy texture, I could have used embossing paste to add even more texture! 


The images are from the newly released Here's to Us and Unmatched! Then, the sentiment is from Served Up! I also used the Cloud Pattern Stencil for a subtle texture in the background!


There is ALWAYS a fun challenge going on in the Create a Smile Stamp Facebook group page! It's fun and filled with prizes! I love seeing all of the incredible, unique and amazing inspiration!
~Samantha


Wednesday, August 19, 2020

Seriously?


Hello crafty friends, it's Kerstin here!

Today I have a special birthday card for you.


I had this idea on my mind since I saw this little grumpy monster for the very first time. In my opinion it is perfect for a special kind of birthday card. The sentiments say something like: you're turning 35 again ... seriously?


  • first I did some inkblendig for the background
  • I stamped all images onto watercolor paper
  • and colored them with watercolors
  • then I added a few details on the monster with colored pencils
  • next I did some fuzzy cutting
  • finally I adhered all images with foam adhesive onto the panel


We love to see your creations. Please use the hashtag #createasmilestamps when your are posting on instagram.

Thanks for stopping by and happy crafting,
Kerstin

We dare you to create a smile: August Sketch

Hello everyone

There is a new sketch challenge starting today and we are so excited to see al your creations ! Make sure to check all the creations that our team created to inspire you play along with us


Also don't forget that by playing along with our challenge you get the chance to win a 25€ gift card to Create a smile store and the chance to be guest designer for our next challenge 


First of all we'd like to share the gorgeous card, made by our guest designer Johanna.  She made a beautiful floral Shaker card using our retired set "Ahola Spirit" and "fine ferns. Her color combo is beautiful. Many of us strugglewhen it comes to using orange, but she  rocked it!


Alexandra made this card using Cool cuts Scalloped Rectangles, Cool cuts Double stitched rectangles ,


MBFAIRYSKY created this clean and simple Floral card using Tender Tulips - I love florals all year round!


Debby made this summery rainbow card with Best Bugs and our Clouds Stencil set. This is so cheerful! 


Ella made this beautiful slimeline card that has a modern, yet rustic look with the Magnolia on the kraft cardstock. What a great idea! She used Lieblings-Alles for her sentiment.


Fabiola made  a happy card with a crafty theme - how cool is that? and her Inkblending adds so much depth and drama!
She used Cool Buddies, Stampingfriends and Scene Builders for her card-


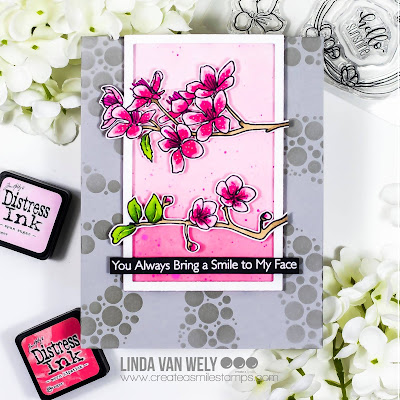
Linda made this gorgeous card using Very cherry stamp setStencil Bubble Rays


Martina made this beautiful card using Floral decorations stamp set Cool cuts Useful banners


Melanie made this wonderful card using Cool cuts Scalloped rectanglesAlles über Dich stamp setPure poppies stamp setEnamel stickers Snow dance


Melissa made this awesome card using In Bloom. Her large colored flowers on a dark background look so intense!


Nathalie made this summer card (oh yes, this perfectly describes my favorite summer moments! ;) ). She used Your favorite icecream and Kirschzeit to create this beautiful project (which reminds me of a 60's design!)


Hope you feel inspired to play along with our challenge . Please make sure to check the challenge rules below before you enter you card!


You are invited to the Inlinkz link party!

Click here to enter

Saturday, August 15, 2020

Slimline Flower Shaker Card

Candice back with you today mixing some of the new release with some classics!


I just knew the Spring Garden stencil would go perfectly with the new flower set, Mallow Blossoms, and wanted to create a beautiful card with the two!


-For my background, I inked the gorgeous flower pattern using the Spring Garden stencil with spun sugar, worn lipstick and picked raspberry oxide inks on a stitched panel.


-I then created my three individual circle shakers by die cutting thick white cardstock many times from the stitched circle frames to be able to create the height for my sequins and kept three of the bases to fill them on. 

-I glued the circles to card front, filled with sequins and covered with the layered circle frames with the acetate between the top two.

-Next, I stamped the flowers from the new Mallow Blossoms set, colored them with copic markers and fussy cut them out.  I also stamped the sentiment and trimmed into a banner.


-I simply finished the card by adhering them all with foam tape over the circle shakers!


Always make your shaker windows big enough to fit your sequins to move.  It is so frustrating when you make your shaker element and they just get stuck!


Stitched Circle Frames             Spring Garden stencil                Mallow Blossoms stamps


Don't forget to check out the fabulous new release available now!

Thank you so much!

Candice


Wednesday, August 12, 2020

Let's Try Something New!!

Hello and welcome!! It's Laurie with you today to share something a little different. I've recently dived in to the world of art journaling and thought I'd use some fabulous CAS products to create a page!


What's great about art journaling is that as a cardmaker you likely have everything you need to get started! There are products on the market specifically made for art journaling but I wanted to show you that you can start with what you have!


I don't even own a proper art journal. I use inexpensive note books that I found on Amazon. These ones were made to fit into a travellers note book. You can even use an old book that you have lying around!


I started by ripping pages out of an old book and gluing then down with Matte Medium Gel. I put a layer of glue on the page, place the paper and apply a thin coat over top. This will seal everything nicely!


After apply a thin layer of Gesso (primer for paper), I scribbled some colour using Derwent Inktense blocks. Please use whatever colouring medium you have!!!  I sprend the colour around using a very wet brush.


You can still the paper peeking through and that's exactly what you want!  Now, it's time to add some stamping! I chose stamp sets that were more graphic for this. This will add more texture and interest to the background!


I used the Hocus Focus which unfortunately is discontinued. But check out the Bujo Basics or Loops of Love sets..they would be perfect here! I also used the Basic Circles Stencil along with a black watercolour pencil to trace some circles around the page. NOTE: for your stamping, you want to use a waterproof ink if you're adding more medium over top. I used Ranger Archival Ink.


After adding a bit of water to the traced circle to blur the lines, I added a little gesso into each circle to lighten them up. A bit of watered down, white acrylic paint would work here as well.

To add even more texture, I used the Blossom Stencil along with white embossing paste to 3 out of the 4 corners of the page.


This is quite subtle but adds a lot of texture and visual interest.  Now, onto the focal point. To brighten this page up, I coloured up a couple images from the Pure Poppies Set in a vibrant pink/purple colour. 


The sentiment was made using the Clear Letters Set and the Cherry Lowercase Alpha Dies. A good alphabet stamp set and die set is a must in any craft stash! 


I glued the flowers down first using regular white glue, then added the sentiments around them.

Because it's hard to stop adding details, I used a white gel pen on almost everything and added a few hearts here and there! I also used the Mix & Match Patterns Set to add a border!


And that's the finished layout!!!

It's always fun to try something new! It's also easy to get caught up and want to purchase "all the new things"! But take a look in your stash before purchasing anything, you likely already have products that will work just fine!
Art journaling is messy. And that's part of the fun but a silicone craft mat will be your best friend!
If you don't have and alpha stamp or die set, that would be the one thing I recommend! The sets I used here are perfect for this application. They are the perfect size!!
Last but not least...have fun! What I've learned about art journaling is that it's not supposed to be perfect! It's about experiementing and adding layer upon layer of paints and papers and pastes!!

I did purchase the Gesso and Matte Medium especially for this craft. Everything else I had on hand. Shop your stash!!

There is always a fun challenge going on the blog which you can find HERE!! Also, please use the hashtag #createasmilestamps when sharing your creations on social media. We love to see what you create!