Saturday, August 24, 2019

Birthday Wishes from Below!

Hi there!
Samantha here, and today I'm sharing birthday wishes from the deep blue sea! ha!


I honestly LOVE that octopus image and I just love the idea of giving him things to hold with his many tentacles! ha!


Let's make this card together!

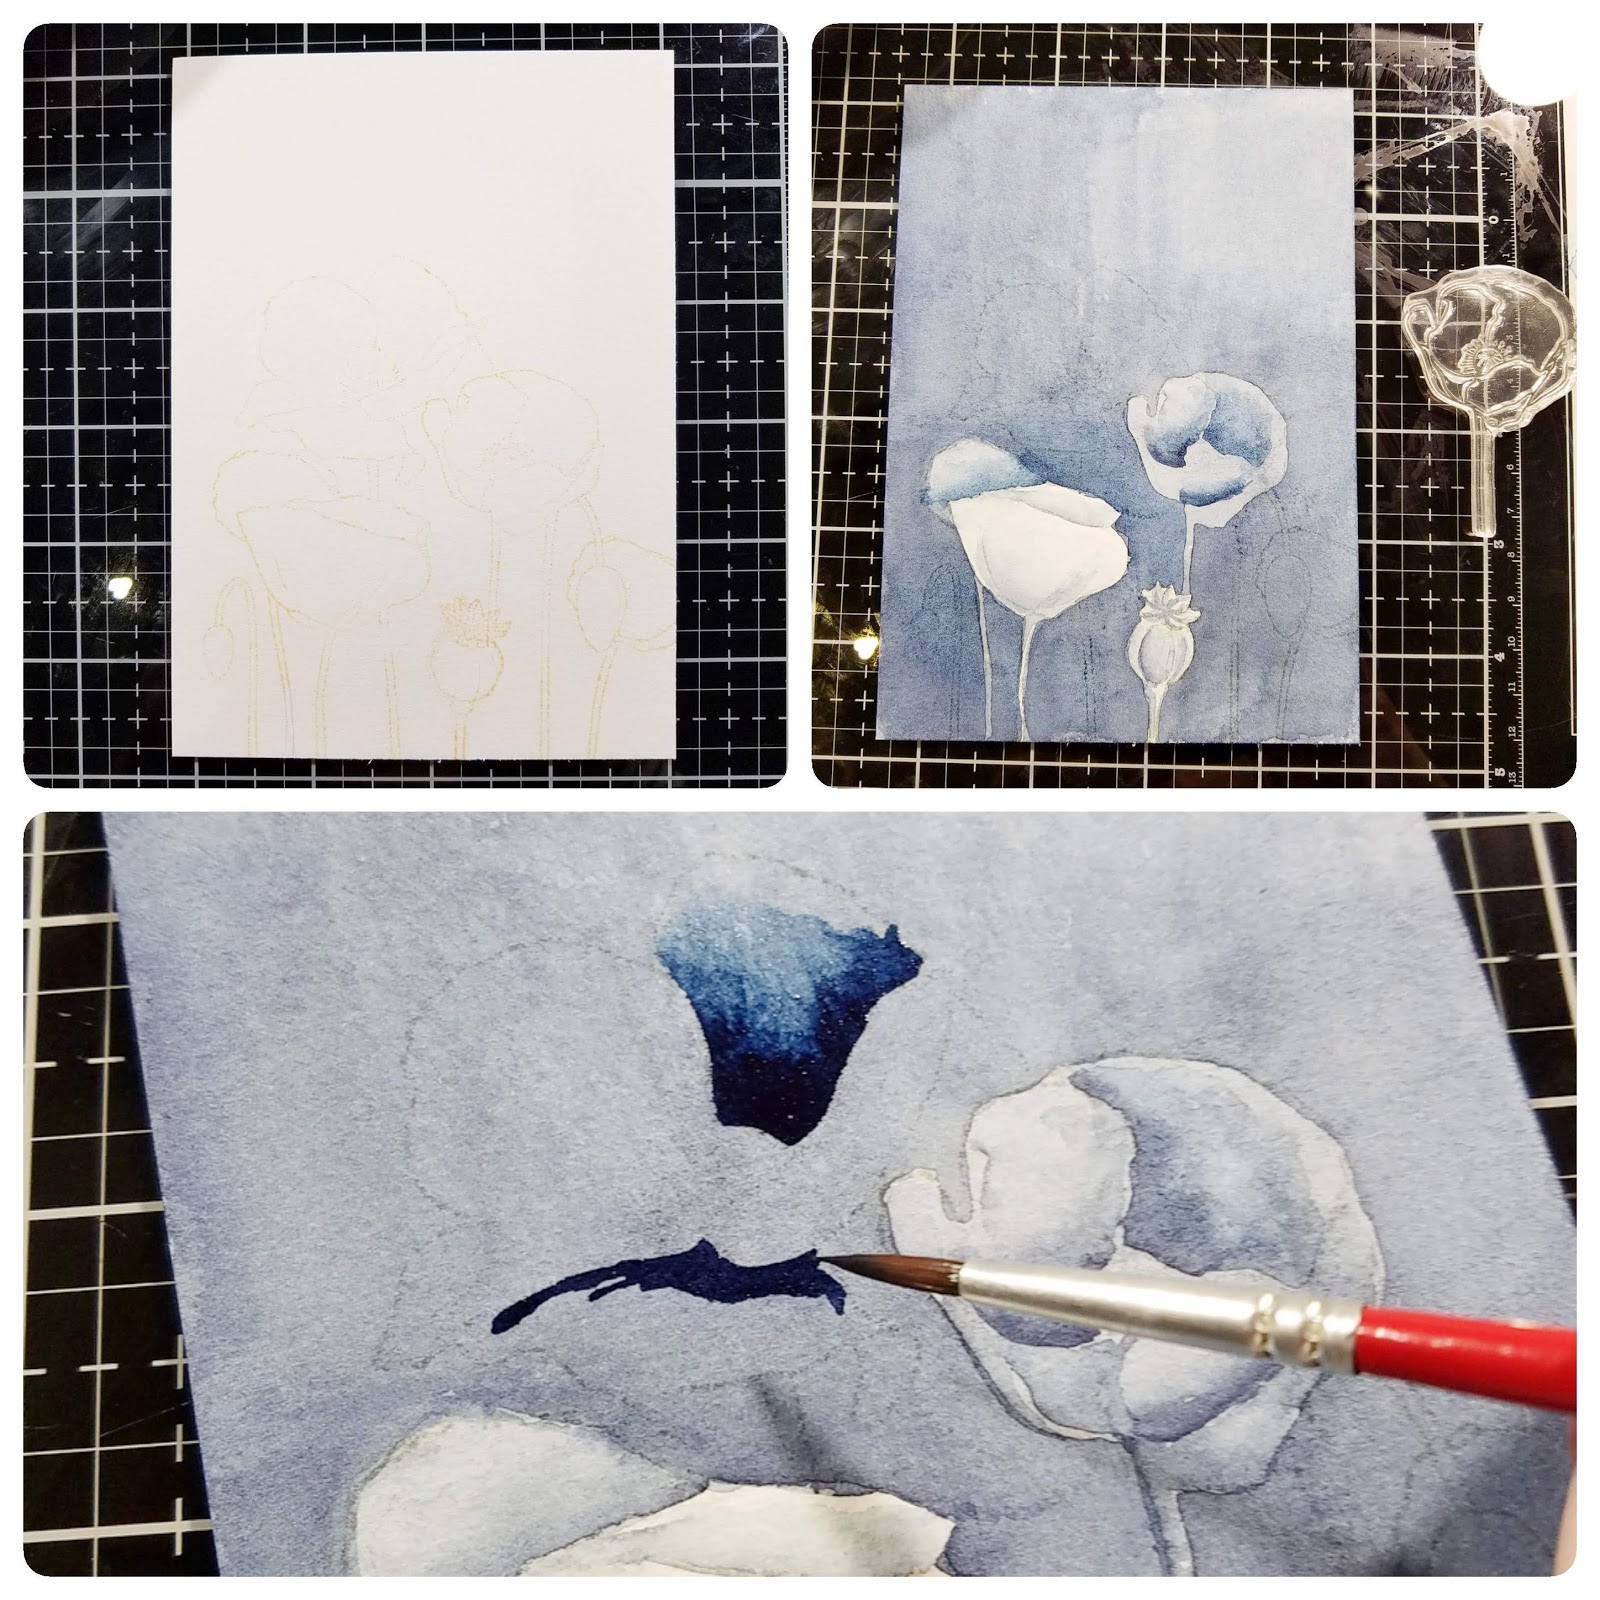
- I started by stamping and coloring octopus and balloons, then fussy cutting them out.
- I stamped the balloons in Distress Oxide Inks (Twisted Citron, Peacock Feathers and Blueprint Sketch)
- to ink blend the circle, I used a mask, which only left the circle area open. The, I ink blended with regular Distress Inks (Cracked Pistachio, Peacock Feathers, Mermaid Lagoon, Blueprint Sketch and Wilted Violet)
- once that was done, I used the same colors, but in Oxide inks to stamp the ocean waves!


- I added foam tape to the octopus and balloons, then stamped the balloon strings.

- once everything was adhered, I used some Crystal Stickles to add glitter to the octopus and balloons!


With just one snap of your fingers, this card could easily be made into a one layer - if that's your thing! LOL!
Simply stamp your images, and then use masks when creating the circle of 'water' with the ink blending and stamping!


I stamped the beautiful wave images with the Ocean Waves Cling stamp over the distress ink-ed circle. And that adorable and SO cute octopus is from the Underwaterlove stamp set! And of course, the balloons are from the super versatile Floating Wishes stamp set!


There is ALWAYS a fun challenge going on in the Create a Smile Stamp Facebook group page! It's fun and filled with prizes! I love seeing all of the incredible, unique and amazing inspiration!
~Samantha


Thursday, August 22, 2019

Winners from sketch challenge

Hello everyone !

Time to see the winners from our latest sketch . As usual there were so many fabulous entries and it was pretty hard for us to decide 

Also wanted to let you know that by playing along with our challenge you get the chance to win a 25€ gift certificate to Create a smile store and to be guest designer for our next challenge!
Without further due our winner is Sandie with this adorable card that she created using our Freebie stamp set 


Congrats  please send an email to challengeteam@createasmilestamps.com to claim your prize ! Is so well deserved !

Our featured artist from this challenge is Leonie with this wonderful card using  Floral decorations stamp set


You can take the badge and display it on your blog is so well deserved !


Thank you to everyone who played along with our challenge! There is a new challenge on the blog and the theme is Mood board so make sure to check it out and play along !

Have a great day

Wednesday, August 21, 2019

Make a wish


Hello crafty friends, it's Kerstin here!
Today I have a very special monochrome birthday card for you.


I wanted to try negative painting with watercolors for soooo long and now I finally did it. The basic idea ist to paint a darker background around the lighter objects.


  • stamp  your images in a light colored ink onto water color paper
  • mask the first layer of your stamped images and stamp some more in the background
  • create as many layers as you want but at least 3 layers
  • start with a very light wash of your watercolor all over the panel and set aside to dry
  • color the images in the first row in a very light shade and let dry
  • lay down a second layer of a darker shade of watercolor around the images in the first row and over the images in the background
  • set aside to dry
  • for the next layer start over again with coloring the images of the second row
  • paint a darker shade of watercolor around the images in the first and the second row and over the images in the third row
  • set aside to dry
  • start over again for the next layer
  • decorate your panel with some white and gold splatters
  • stamp your sentiment on vellum and heat emboss


... or lessons learned. Here are some things you should do better than me. ;-)


  1. Plan your layers well! I got quite confused about what to color and what to leave unpainted during the process.
  2. Use a recognizeable darker color for each layer! The second and the third layer in my project are too similar.
  3. Paint fast! Otherwise your paint dries too quickly and your background becomes blotchy.


Thanks for stopping by and happy crafting,
Kerstin

We dare you to create a smile : Mood board

Hello everyone!

It's again time for a new challenge and look at this gorgeous summery colors that our mood board has. We can't wait to see all the beautiful projects you will create inspired by this mood board


Also don't forget that by playing along with our challenge you get the chance to win a 25€ gift card to Create a smile store and the chance to be guest designer for our next challenge 

Let's see what our guest designers have created inspired by the new theme 

Kuni created this sweet and adorable card using Möwen Gang stamp set


Marina made this lovely card using Clematis stamp set


Thank you so much for being guest designer in our challenge and creating such beautiful projects. Please make sure to check their social media and leave them some love

The design team also created some gorgeous projects inspired by the new mood board  . Here they are


Ildi created this stunning card using Lovely critters stamp set


Viola made this adorable card using Cling Cloudy day stamp Möwen Gang stamp set


Hope you got inspired and now is your time to be creative!
Please before entering your project make sure to check the rules which are listed below


You are invited to the Inlinkz link party!

Click here to enter

Wednesday, August 14, 2019

Bearmail Thanks!

A big hello to all our crafty friends!

It's Candice here and I have a sweet thank you card for you today!


Have you ever wanted to really say thank you to someone?!  I did and thought using a lot of thanks dies would do it!


To fit all my thanks onto my card, I created an 8 1/2 x 3 1/2 slim line card base.
-Trim another piece to fit on the front with three sides a little smaller.
-For the background, ink with broken china, shabby shutters, scattered straw & spiced marmalade.
-Splatter with water, white & brown paint.


-Die cut multiple thanks from thick white cardstock, adhere to the side and trim the excess off.
-Stamp the envelopes on pattern paper.
-Stamp the adorable bear, bird & mailbox, color with light copic markers, and fussy cut out.


I always create my splatter backgrounds first so they have time to dry while I color my images.  It also helps me to decide what colors to use on my images to have them match!


There is a fun new embossed resist challenge on FB and you can join to have a chance to win!

Be inspired to try a new technique and I can't wait to see your creation!

Thank you for visiting!
Candice