Saturday, June 27, 2020

Hello Card with Ink Blending

Hi there!
Samantha here, and today a happy hello card!


It's no surprise that I absolutely love ink blending! And when I was playing with the new Basic Circles stencils, I knew I wanted to add some beautiful stamping with the new Wildflowers stamp set, too!


Let's make this card together!

- I started by placing the circle mask on my card front. 
- then I held it in place while I used some warm Distress Ink colors to ink blend around! I used: Milled Lavendar, Seedless Preserves, Picked Raspberry, Abandoned Coral, Dired Marigold and Squeezed Lemonade
- then I stamped the images on top, in the same colors! 


- I also splatted some water and white acrylic ink on top of everything!
- I stamped the sentiment in black, and heat embossed clear embossing powder on top
- then I finished the card off with some black enamel dots and sequins!


You could easily make a card set of this design in a wide array of colors! You could even change up the sentiment to make a birthday card, get well card, anything! It would be a wonderful gift set for someone special!


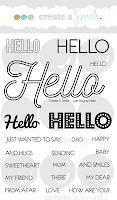
The beautiful floral images are from the Wildflowers stamp set,, and I paired them with the Basic Circles Stencil! I heat embossed the sentiment from Just Saying Hello.


There is ALWAYS a fun challenge going on in the Create a Smile Stamp Facebook group page! It's fun and filled with prizes! I love seeing all of the incredible, unique and amazing inspiration!
~Samantha


Wednesday, June 24, 2020

Winners from Mood board challenge

Hello everyone !

Time to pick our winners from the latest mood board challenge . Thank you everyone who played along there were so many amazing entries again 

Also wanted to let you know that by playing along with our challenge you get the chance to win a 25€ gift certificate to Create a smile store and to be guest designer for our next challenge!


The winner of a 25€ gift card is Lisa with this gorgeous card using Stencil SlicesFruit salad stamp set  , Lettering Alphas stamp set


Congrats  please send an email to challengeteam@createasmilestamps.com to claim your prize ! Is so well deserved !

Our featured artist from the sketch challenge is Marina with this adorable card using Fruit salad stamp setKroküsse stamp set 


Congrats !! You can take the badge and display it on your blog is so well deserved !


 Make sure to check the blog for the new challenge and I hope you are inspired to play along with us. 
Until next time have a great day!

Alexandra

We dare you to create a smile: June Sketch

Hello everyone

We are so happy to share with you the new inspiration sketch , and we hope you like it as much as we did !


Also don't forget that by playing along with our challenge you get the chance to win a 25€ gift certificate to Create a smile store and also to guest design for our next challenge 

Let's see how our team was inspired by the new challenge

Alexandra made this card using Floral decorations stamp set Cool cuts Scalloped RectanglesCool cuts Thanks twice, Solid Florals stamp set (upcoming release)


Anja made this wonderful card using Floral decorations stamp set Aus der Ferne stamp set


MBFAIRYSKY created this beautiful card using Magic flowers stamp set (retired), Stencil Diagonal grid  


Ella made this beautiful card using Licht ins dunkel stamp set Licht an! stamp set


Fabiola made this lovely card using one of our Gull Gang stamp set ,


Linda made this gorgeous card using Cart full of treasures stamp set Cool cuts Happy


Martina made this adorable card using one of our First day of school stamp set Stencil Diamonds


Melanie made this wonderful card using Coffee collection stamp set Kleine Sprüche stamp set Stencil Small polka dotsEnamel stickers Coffee collection


Melissa made this awesome card using Decorated wishes Mixed add-ons stamp set Cool cuts Magical frame Enamel stickekers Fruitalicious ,


Hope you feel inspired to play along with our challenge . Please make sure to check the challenge rules below before you enter you card!


You are invited to the Inlinkz link party!
Click here to enter

Saturday, June 20, 2020

Big Hugs

Hello! Candice here with you today and I have a very crafty slimline card for you!


I loved doing the cross stitch cards but I am now converted to the slimline size so when I realized that my cameo can cut anything, I decided to try a cross stitch panel and it worked!!!


-First I created an 8 1/2 x 3 1/2 card base from Kraft cardstock.
-I then used my cameo silhouette to create my cross stitch panel and saved it do definitely do more!  It's time for you to dust yours off!
-I found my succulent patterns on pinterest, there are so many ideas there for small cross stitch patterns!


-Next, I stamped all the succulents from the Sharp One stamp set, colored them with copic markers and used my scan n' cut to cut them out.
-I cut my banner from the bottom of a stitched rectangle and heat embossed the hugs in white.
-For the large big, I tried out one of Christine's daily videos on Create a Smile's IG using watercolor on the stamped sentiment.  I used crushed olive oxide ink with a Zig clean color marker.


ALWAYS try your ideas, most of the time you are absolutely going to love the results!


Sharp One stamps                     Big Surprise stamps            Double Stitched Rectangle dies


Keep your eye out this week for sneak peeks because the new release is coming on Friday, June 26th!

Thank you for stopping by today!
Candice

Wednesday, June 10, 2020

Easy Watercolouring Using a Stencil!

Hello, friends and welcome!! Laurie with you today to share a super simple watercoloring technique using a stencil. This is one of my all time favourite things to do. I have zero drawing ability, even simple shapes are a struggle, haha! With this technique, it really does give the look of a hand painted masterpiece!


I made a card using this technique awhile ago and was asked how it was done so I thought today would be a great time to share! 

I started by cutting down a panel of Mixed Media paper to 5.25 X 4 inches. I picked Peeled Paint, Crushed Olive and Forest Moss as my colour palette.


Using the Ferns Stencil, I used the various leaves in the 3 different green shades and ink blended just like you'd normally do.


This is where it gets fun! First, blend out the images with a little water and paintbrush. Don't use too much water. This will soften the edges nicely. I smooshed the three same ink colours onto a palette and using a small paintbrush, simply added some of the ink onto the images. NOTE: my paintbrush was just damp, almost dry. This allows you to create some detailed lines.


You can see the difference these little strokes of colour make. The fern on the bottom right corner has only been blended out at this stage. But the fern I working on is much more detailed!


And that's the finished result! Although, at this stage, I thought it was a bit too stark. So, I used Brushed Corduroy Distress Ink to add some colour around the edges. This also gave it a more vintage look.


I carefully wet the edges of the paper then added the ink. Try not to get too close to the ferns or the colour will reactivate and start to move. A little is ok! 


I think this is much better. Now, let's finish up the card.  I used the Decorated Wishes-Mixed Add ons set for the sentiment. The "For You" happened to fit perfectly.


I used the Brushed Corduroy Distress Ink for the sentiment and added a few small hearts to act as embellishments.


If you're going to try this technique, my biggest tip is to not use too much water! You want to maintain the shape of your images and also have the control to add the details!
I used Distress Ink to stamp my sentiment. We all know that these inks are awesome at everything except stamping so use your stamp positioning tool so you can do multiple impressions!

You don't have to be an "artist" to get an artistic look! Just sit down and literally play with your supplies!


Thank you for stopping by!!

Laurie