Showing posts with label treats. Show all posts

Saturday, February 28, 2015

Personalize Your Card!

Hey stampers, Anni here, it's Saturday again and it's my turn to show you a card!


A good friend of mine gave birth to a baby boy (his name is Mads) this week and I wanted to make a personalized baby card for her. I think it's the benefit of being a crafter that you can send cards that were made especially for one special person.



  • Stamp, color and fuzzy cut the digger.
  • Die cut the name of the baby from patterned paper.
  • Stamp the sentiemnt on another piece of patterned paper.
  • Adhere the digger, the letters and the piece of PP to a panel of paper.
  • Add a piece of PP to your card base and assemble the card.


In the inside of the card I added the birth date of the boy!
There are other ways to personalize your card: 
  • Think of the favorite color of the person you are making the card for! 
  • What hobbies does he or she have? 
  • Put the age on the card if you are making a birthday card!
  • Is there an insider joke you are sharing? Use it as a sentiment!


Create a Smile is a sponsor for the Spring Coffee Lovers Blog Hop. There are amazing prizes! Hop over to take a chance!



Thursday, February 5, 2015

Hooray!

Hello crafty friends, Yoonsun here!

To be honest, making card with washi tape wasn't familiar with me. But, I am attracted by Create A Smile adorable washi tapes now!!!

For my card today, I used washi tapes as my main embellishments. It was so much fun!


When I saw Ausflippen German sentiment stamp set, I was in love with 'Hurra!' stamp immediately -By the way 'Hurra!' means 'Hooray!' in English. For some reason, there would be a wonderful surprise with that 'Hurra!' stamp. So, I decided to turn washi tapes into heart shaped embellishments for more fun!!

 
  • For washi tape embellishments: Stick washi tapes to the white cardstock and punch them with mini heart craft punch. 
  • For watercolour panel: Heat emboss 'Hurra!' stamp onto the watercolour paper panel in clear and blend with different coloured distress inks -Mustard Seed, Mowed Lawn, and Peacock Feathers. Spritz a bit of water and then dry using heat tool. Add some white ink spray for more fun.
  • Affix washi tape embellishments, assorted sequins, star shape wood veneers suitably.


February release is coming next Friday!! Check out our Facebook page

And, we are looking for our March Guest Designer! Join in the fun!!


Thanks for stopping by! Have a wonderful day!!
xoxo Yoonsun


Monday, January 26, 2015

Keep your head up.......

Hello, it's Anja again, last week I showed you how to alter a box with the lovely new released papers and today I would like to show a card with these papers.


For this card I would like to focus on the paper and just use two colors for my card. I think it makes the card more clean and simple when you only use two colors. I love to use the rectangle look and combine it with another shape, for this card the circles.


Cut two pieces of the patterend paper and figure out where you would like to place them on your card.
Die cut two circles out of the patterend paper and place them on your card.
I stamped the flower from Bad Day on the smallest circle and colored the image with copics.
To give it some more interest I diecut the swirl out of vellum and placed it behind the two circles.
Finally stamped the sentiment in the corner to finish of the card.


First figure out how you would like to place your papers before glueing them down unless you use a non permanent glue.
Use some vellum on your card to give it an extra interest and make your image pop.

 
To link up your creations at the side bar. We would love to see what you create with our supplies.
 
Thanks for stopping by and have a great week.
"See" you next time,
 
Anja


Saturday, January 24, 2015

Wishing You Sunshine

Hey, stampers, Anni here!
Hope you are well where ever you are and having a great weekend.
Here is today's card:


I don't know about you but days are grey overhere in Germany at the moment. So I knew I wanted to make a sunny card. The new patterned papers from Create a Smile are just perfect for that theme with all its sunny warm colors mixed with some fresh aqua and turquoise tones. And the new washi tapes go perfectly with them!


  • Color and fuzzy cut the fox.
  • Paper piece the umbrella and the towel.
  • Die cut a piece of cardstock and add some washi tape to create a "ground" for the fox.
  • Stamp the sentiment.
  • Assemble the card.
  • Add some enamel dots.


  • I have to be honest: The cute little fox from the set Friends in the Woods is still one of my favorite stamps! I used him a lot so I wanted to dress him up a little to get a different look! I went through my dies and found these cute sun glasses that fit perfectly. So think about combining stamps and dies!
  • The patterned paper from Create a Smile is perfect for paper piecing. It is sturdy and very smooth. Some of the colors have a glossy finish (which I love very much) but I was sceptical at first how the stamping will work out. But let me tell you it goes very well and I am very impressed by the quality of the paper. The pattern on the backsides of the papers are very subtle. I like that for paper piecing small areas!
  • Tear the washi tape to get an intresting edge!
  • Don't forget to use a black pen on the edges of your fuzzy cut pieces to make it look perfect cut.


Is your creating influenced by the weather? Sunny cards in the winter and cool, fresh cards in the summer? Tell me! I would love to here!

Sunday, January 18, 2015

Video: Close up on our new treats

Hello lovely friends and welcome to a beautiful sunday!

(It's indeed a sunny day here in Germany, at least in the area where I live).
Some of you told me they'd like to see a close-up video on the new products, so here it is:


We're so happy you love the new products and would LOOOVE to see your projects using them.


- We added a linky tool to the sidebar -
Please please share your creations with us and link them up so we don't miss them! That would be MUCH appreciated! Thank you!


As always you can find all the products shown in the video in our shop. And did you know there's a package of all three washi tapes that is less expensive than buying them seperately? Just perfect for all you washi-lovers :)


Saturday, January 17, 2015

Coloring with Colored Pencils Part 2

Hey, Anni here!

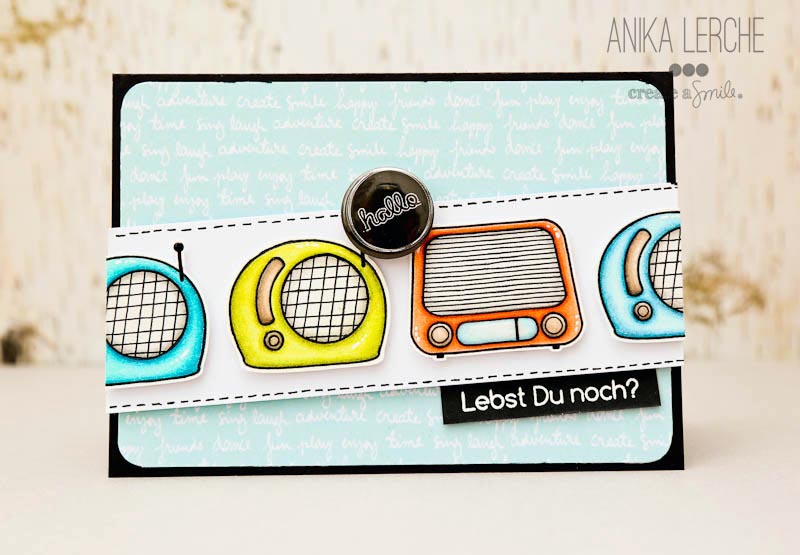
At first my card for today again using colored pencils for coloring!  I also used some of the fabulous stuff that is new in the shop! Beautiful patterned paper (Isn't it great that Christine has the same favorite colors like me? :) ), amazing washi tape and fabulous flair buttons! Aww, what an eye candy...!


And a closer photo of the new flair!


  • Stamp, color and fuzzy cut the radios!
  • Adhere them on a stripe of paper!
  • Adhere  patterned paper to your card base!
  • Add the sentiment and the flair!


Two weeks ago I shared a tutorial on how to color with colored pencils. Thank you so much for your kind words you left here and on my blog. It was very appreciated!
Today I want to say a few things that were inspired by the questions, tips and tricks I got from you!

  • Sonja from The Art of Stamping told me that it was better to use a blender pencil instead of a white pencil to blend the colors, for example this one from Prismacolor! I tried it before and didn't like it very much. But after talking to Sonja I gave it another chance and we are slowly becoming friends!
  • I am very proud to tell you that Julia was inspired by my tutorial, too! She is doing the coloring a bit different, she is using Zest it! to blend the colors. On her blog Just one more card you can see a video about it!
  • My dearest team mate Anja asked, if you can combine Copics and Polychromos. That works perfectly if you use at first the Copics and then the Polychromos! NEVER the other way round because the wax in the colored pencils can ruin the tips of the Copics. But you can use the Copics to lay down a wash of color and add shadows and details with the Polychromos.
  • Fabulous Tanja from Stempelspielplatz  asked, which kind of fine tip pen I use. In generell it is the same thing as with the Copics. The wax in the colored pencils is not good for the tip of your pen. So don't use expensive stuff. I bought the set from Prismacolor, the price is ok and I like the variety of width. You have to be careful when you use the pen on the colored areas because they take some toime to try - ask me how I know!


The guest designer call for March is coming up the next days so stay tuned!