Wednesday, May 26, 2021

Winners from May mood board challenge

Hello everyone !

It's time to pick our winners !! Thank you everyone for playing along with our mood board challenge !


Also wanted to let you know that by playing along with our challenge you get the chance to win a 25€ gift certificate to Create a smile store and to be guest designer for our next challenge!


The winner of a 25€ gift card is Zuzana with this gorgeous card using  Unmatched stamp setFruit salad stamp set , Super powers stamp set


Congrats  please send an email to challengeteam@createasmilestamps.com to claim your prize ! Is so well deserved !

Our featured artist from the mood board challenge is Eva  with this wonderful card using Pure poppies stamp set , Cool cuts Hallo Mono


Congrats !! You can take the badge and display it on your blog is so well deserved ! if you would like to guest design for our next challenge please send an email to challengeteam@createasmilestamps.com so i can let you know the details.


 Make sure to check the blog for the new challenge and I hope you are inspired to play along with us. 
Until next time have a great day!

Alexandra

We dare you to create a smile : May Sketch

Hello everyone 

We are so happy to share with you our new challenge and this time there is a sketch to inspire you to play along with us.


Also don't forget that by playing along with our challenge you get the chance to win a 25€ to Create a smile store

 Our guest designers made such fabulous cards using today's sketch to bring you inspiration. Let's check their cards out!


Thank you for guest designing for our challenge ! Make sure to check their amazing creations and leave them some love.

Let's see what our design team created inspired by the sketch 


Candice  made this beautiful card using Quill & ink stamp set  , Stencil Ferns  , Best bugs stamp set


Claudia  created this adorable card using Tea time stamp set , Cool cuts Postage Edge circles 


Jeanne  made this lovely card using Bis zum Mond stamp set , Oh du fröhliche stamp set ( from Advent kalendar)  Cool Cuts Postage Edge Circles , Cool cuts Stacked Pierced ovals


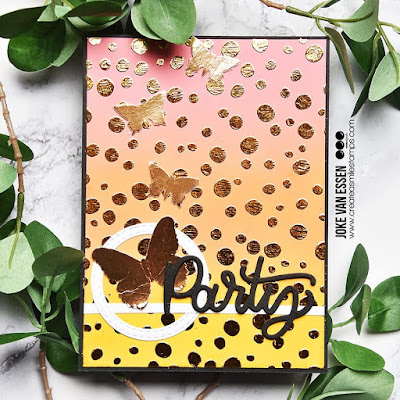
Joke  created this wonderful card using Cool cuts Party Mono  , Stencil Cobblestones  


Vicki made this adorable card using Cool Cuts Double Stitched Rectangles  , Bear mail stamp set 


Before you enter our challenge please make sure to check the rules below 


Thank you for stopping by ! Have a great day 

Alexandra 


You are invited to the Inlinkz link party!

Click here to enter

Wednesday, May 19, 2021

Party!

Hello crafty friends, it's Kerstin here!

today I have a birthday card for you without any coloring. 


Sometimes I'm not in the mood for coloring or I don't have the time color cute images. Then I love to use bigger die cuts and stencils.


  • use the din lang postage cool cut for cutting the panel
  • use the Confetti Stencil to create a confetti like background 
  • for one layer I used glimmer texture paste in yellow
  • cut out the sentiment 3 times (1 in yellow and 2 in dark green)
  • adhere the sentiments slightly shifted to create a shadow
  • adhere the sentiment and the panel to your card base


To add some interest you can stamp some ballons at the inside of your card.


We love to see your creations. Please use the hashtag #createasmilestamps when you're sharing your projects on instagram.

Thanks for stopping by and happy crafting,
Kerstin


Saturday, May 15, 2021

Thinking of You

Hello crafty friends! Candice back with you sharing an elegant slimline card for you today!


I find these flowers to be illustrated beautifully and wanted them to be the center of attention on my slimline design!


I began with an 7 3/4 x 3 1/2 card base and die cut the stitched panel to fit onto the card front.


You have to look closely and see that I used a no line coloring grey ink to repeatedly stamp the "YOU" across the stitched panel for a very soft background detail.  

I then die cut the lines into the center of the card and stamping the "thinking of" in black versafine ink.  I finished the sentiment with a layered "YOU" with the top in grey.

Next, I stamped the beautiful flowers, colored them with copic markers and fussy cut them out.


To put the card together, I added the panel with foam tape, tucked the flowers into the slits and just added foam tape to the tops to add dimension and finished with some silver jewels!


Keeping your color palette simple helps to highlight your stamps and really creates an elegant feel to your design.


You can join the current bi-weekly challenge for your chance to win!  We would love to see your creations!


Thank you so much for stopping by with me today!

Candice


Wednesday, May 12, 2021

Hey Chick!!

 Hello and welcome!! It's Laurie with you today to share a fun, mini slimline card mad with some of the newest products from the shop!


The inspiration for this whole card came from that little "egg" die cut in the centre. This "egg" is actually the wax label die that's part of the Din Lang Postage Cool Cuts!  As soon as I seen it, I thought it would make the perfect egg.

I started by creating a card base that measures 6.5 X 3.5 inches. The white panel measures 6.25 X 3.25 inches and mats nicely.  I picked two chickens from the new Crazy Chick Stamp Set. I coloured them simply with alcohol markers. I fussy cut each image out. 

On the white panel, I ink blended two spots to create a little sky. I went through my die stash and found a fence die which I cut once and cut in half. I also added some grass. 

I made two little scenes by foam mounting all the die cuts and chickens. To create the "yolk", I used the smallest die from the Stitched Circle Frames Cool Cuts. I used my markers to colour it yellow.

I temporarily adhered the egg to white panel and using my Misti, I stamped the sentiment. This left stamping on both the egg and the card panel. I did have to do a couple of touch ups with a black pen to fill in areas that didn't stamp well...this was especially around the yellow circle. But very easy to do!

To add a bit of dimension, I did add foam tape to the back of the egg.

I adhered the white panel onto the blue card base and decided to add some drawn lines around the entire panel.


Look through your stash of dies. Often times your imagination will allow you to use some of these shapes in new and unique ways!


Join our Mood Board Challenge to get the creative juices flowing! Also, we have a great Facebook page which is full of inspiration!

Thanks so much for stopping by today! 


                                                                  Stitched Circle Frames