Seiten

Saturday, November 28, 2020

Whoops! Santa Was Clumsy!

Hi there!
Samantha here, and today I am sharing a Christmas card that should make you laugh!


See? I told you it was silly!! Poor Santa got stuck!
Every year I have to make a few 'belated' style Christmas cards - you never know when life will get in the way, and I'll be late sending them! Ha!

Let's make this card together!

- I started by using the Basic Ovals Stencil as the background of my card! I used Distress Inks in Chipped Sapphire, Mermaid Lagoon and Cracked Pistachio to ink blend the colors of the sky!
- Then I splattered some water and white acrylic paint on top!
- Next, I moved on to the images! I stamped them all, and colored them with Zig Clean Color Real Brush Markers
- Once everything was dry, I fussy cut them out!

- I heat embossed the sentiment onto a strip of black cardstock, and then trimmed it to look like a banner!
- I also used white embossing paste and the beautiful snowflake stencil to add texture to the background!


I used the stencil to create the Oval shape for the sky, but the stencil is so versatile that you could use the Mask shapes of the stencil, and ink blend in all areas except the oval! That would be a fun twist on the scene!


That beautiful snowflake stencil is from the GORGEOUS Frosty Fun Kit! I used the images from the hilarious Santa Clumsy stamp set! And for the background, I used the super versatile Basic Ovals stencil!


There is ALWAYS a fun challenge going on in the Create a Smile Stamp Facebook group page! It's fun and filled with prizes! I love seeing all of the incredible, unique and amazing inspiration!
 
~Samantha


Wednesday, November 25, 2020

We dare you to create a smile : November mood board

 Hello everyone

Another challenge starts today and the theme is a mood board . We hope that you will be inspired to play along with our challenge and we cannot wait to see all your amazing creations .


Also don't forget that by playing along with our challenge you get the chance to win a 25€ gift card to Create a smile store and the chance to be guest designer for our next challenge 

Now is our challenge design team turn to show you all the different cards they made to inspire you to play along with our challenge

Alexandra made this card using Mouse au Chocolat stamp set  , Cool cuts Stitched Rectangle Frames


Anja made this beautiful card using  Cool cuts Scalloped RectanglesZauberhafte Weichnachtszeit stamp set  , 


MBFAIRYSKY made this wonderful card using Very cherry stamp set , Stencil Blossom


Debby made this gorgeous card using Stencil Diamonds  , Stencil ferns  , Lights on! stamp set


Ella made this fantastic card using  Einatmen, Ausatmen stamp set  , Cool cuts Doppeltes Danke Mini Danke stamp set


Fabiola made this  adorable card using Small sentiments stamp set , Eggstraordinary egghunt stamp set , Cool cuts Postage Edge Circles


Linda made this wonderful card using Very Cherry stamp set


Melissa made this cute card using Big surprise stamp set  , Happy days stamp set


 Please make sure to check the challenge rules below before you enter you card!


Thank you for stopping by today ! Until next time have a lovely day 


You are invited to the Inlinkz link party!

Click here to enter

Winners from November sketch

 Hello everyone !


Thank you for playing along with our latest sketch challenge. There were so many amazing entries and such creative takes on the sketch, and we enjoyed seeing them all . So let's see who are the winners :

Drumrolls, please!


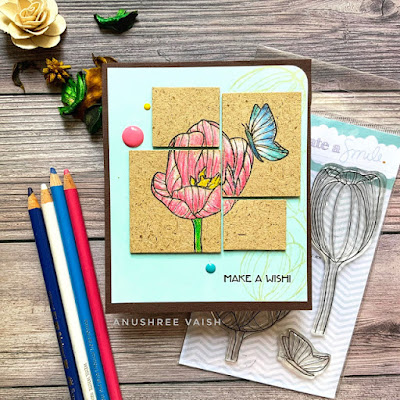
Anushree you are the winner! She created this beautiful card using Tender Tulips stamp set , Superpowers stamp set


Congrats  please send an email to challengeteam@createasmilestamps.com to claim your prize ! Is so well deserved !

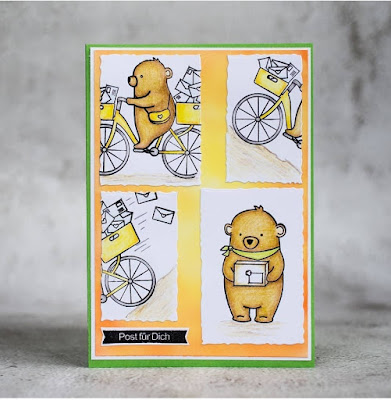
Our featured artist is Eleonore  and she created this cute card using Bärmail stamp set


Congrats !! You can take the badge and display it on your blog is so well deserved! (Also send an email to challengeteam@createasmilestamps.com if you'd like to be a guest designer for an upcoming challenge :) )

Thank you everyone for playing along with our sketch challenge ! Make sure to check the current challenge and we hope you play along 

Until next time have a lovely day

Alexandra

Saturday, November 21, 2020

Snowflakes and Flowers

 Hello my Crafty Friends!  Candice with you today with another floral Christmas card!


I truly believe that Create a Smile has the best floral stamps out there and I wanted to use them in a Christmas card, so I combined snowflakes and flowers!


I began my card with an 8 1/2 x 3 1/2 card base.

For the background, I first used the snowflake stencil stamping it with an embossing ink pad and heat embossing the large snowflake in white.  I then lightly applied victorian velvet and milled lavender in an ombre effect.

I die cut 2 snowflakes from thick white cardstock, adhered to the inked panel and trimmed the edges off and glued this panel to the front of my card base.


Next, I stamped my flowers and leaves from the Floral Decorations and Wildflowers stamp sets, colored them with copic markers and accenting with a white pen and fussy cut them out.  I attached them to the card with glue dots and foam tape to give dimension as it flows across the card!

I finished by die cutting my stitched banner, heat embossing the sentiment from the Small Christmas Sentiments stamp set and inked with victorian velvet.  I also added a few snowflake sequins, clear domes and white nuvo drops!


Floral cards are out of my comfort zone, but I find the Create a Smile floral stamps to be a great size and variety to easily work with for stunning flower cards!


You can get free shipping WORLDWIDE through Sunday night on all of the fabulous Create a Smile products HERE!

Thank you for visiting today!
Candice

Wednesday, November 11, 2020

Trio of Friends Using Masking!

 Hello, friends and welcome back! Laurie with you today to share a winter themed card featuring a trio of cold weather buddies!


I enjoy masking but it has to be simple. I'm not into creating complicated scenes although I'd like to try some day! I wanted to create a little winter scene featuring a trio of friends.


I started by stamping out the image that I wanted to be in the "front" of the scene. In this case, it was the large penguin from the Cool Buddies Stamp Set. I then stamped it again onto some masking paper.


I placed the mask over top then added my next stamp. I chose the crazy, cute walrus from Big Surprise. I also created a mask for him. After placing the mask on the walrus, I stamped the smaller penguin also from the Cool Buddies Set.


You can see how placing these simple masks create one solid image.  This is how the trio looks cut and coloured.


To create the background for my card, I white, heat embossed some snowflakes onto a white card panel. These came from the Cool Buddies Set as well as the Clumsy Santa Set. Over the top of the snowflakes, I used a combination of Spun Sugar and Tumbled Glass Distress Inks.  I wanted to switch things up and add some pink to the sky!


I had a snowbank cut from white cardstock on my desk already, so I decided to use it here.  Before putting everything together, I stamped the sentiment on the lower, right corner of the snowbank. I used quite a bit of foam tape on this card because I love having dimension of my cards.


If you're new to masking, I suggest you start with a simple project like this. Always remember, the image you want in front of your grouping, needs to be stamped first. This is a big tip and one I forgot to do on this card... if you want to add a hat to an image, you have to stamp that first! Because it's sitting on top of the head, it is in front. 


Another tip for winter cards is glitter! I love adding glitter (in this case, Stickles), to add the glisten of snow!


CAS is putting on a 10 Minute Christmas Card Challenge!! What a great way to get those Christmas cards done, right!! Visit the Create A Smile Instagram Page for the details and if you participate, use the hashtag #10minchristmascard!


Thank you so much for stopping by and happy card making!!

Laurie